Serverless compute architectural pattern allows you to run code without provisioning or managing servers, creating workload-aware cluster scaling logic, maintaining event integrations, or managing runtimes. AWS Lambda and Google Cloud Functions in GCP are important services that are based on this pattern and can be extended to support event streaming pipelines. AWS Lambda is integrated with the majority of the services of the AWS big data ecosystem. Likewise for the integration of Google Cloud Functions with Google Cloud Platform. This presents an opportunity for you to integrate the Aerospike database with the broader cloud ecosystem, in order to build efficient cloud-native streaming pipelines.
Aerospike Connect for Event Stream Processing (ESP) or the ESP connector converts Change Notification (CN) over XDR into HTTP/1 or HTTP/2 requests and streams them to downstream consumers or any system that can ingest HTTP requests. In our earlier blog, we had shared several Connect for ESP-powered use cases. In this blog, we will hone in on the serverless event processing pattern and show how you can leverage AWS Lambda or Google Cloud Functions in conjunction with Aerospike Connect for ESP and Aerospike database to implement them.
With serverless functions, you can develop your own function for supported backend services, all with zero administration. Further, you can code those functions in your favorite language (Node.js, Python, Go, Java, and more), while leveraging both serverless and container tools provided by the cloud providers to build, test, and deploy them. In this blog, I am assuming that you have the familiarity or, better yet, the experience to write Lambda or Google Cloud Functions. If you are not familiar with them, then I’d encourage you to refer to the documentation offered by AWS or GCP to help write your own serverless functions.
The following is a simple example to walk you through how I built a streaming pipeline to stream Aerospike Change Notification (CN) events, which are Change Data Capture or CDC-like, to AWS SQS. As depicted in figure 1, ESP Connector converts the CN events from the XDR protocol to HTTP POST requests. The change notification payload can be serialized into a text format, such as JSON, or a binary format, such as Avro or MessagePack, via a configuration for efficient data exchange. The HTTP request is forwarded to an API Gateway (or an Application load balancer), which triggers the Lambda function. The Lambda function subsequently writes the CN payload to AWS SQS. Optionally, you can persist state information or the raw CN payload in the Aerospike database via the Aerospike REST Gateway, for future use. I’d like to remind you that though SQS was chosen as the final destination here, you can extend this pipeline to support any AWS big data service that Lambda is integrated with.
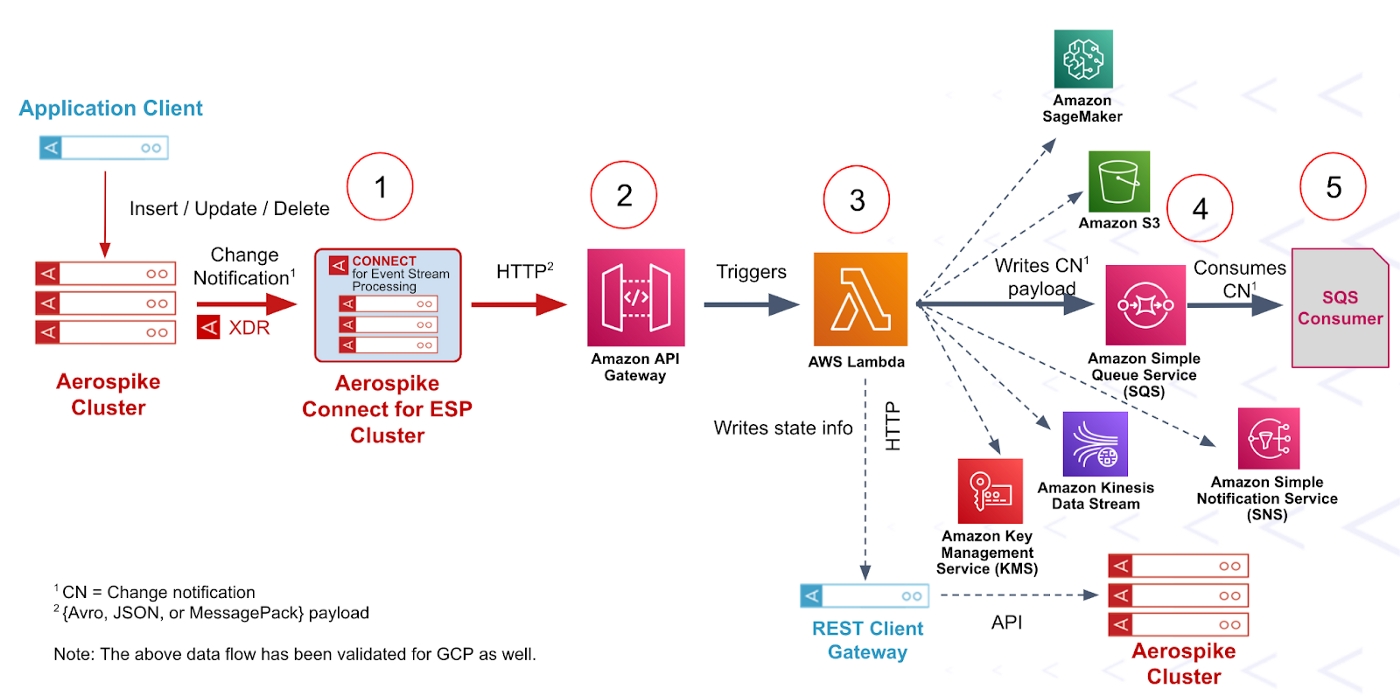
Figure 1 - Serverless Processing data pipeline
Operationalizing the Streaming Pipeline
Step 1: Install and configure the ESP Connector
Follow the ESP Connector documentation for installing and setting up the ESP connector for receiving change notifications from the Aerospike database. Please be aware that you will need the change notification key in your existing Aerospike cluster that you can request here or download the full-featured single-node Aerospike EE version which already has the key turned on for a seamless trial experience. If you are not familiar with the Aerospike XDR configuration, you can refer to it here. Below is the sample XDR stanza which can be used for this example:
xdr {
  dc esp_outbound {
    connector true
    namespace test {
    }
    node-address-port localhost 8080
  }
}
I’d highly recommend that you deploy multiple instances of the connector for fault tolerance and scale them out/in based on the load.
Below is the sample ESP outbound configuration for your reference:
# Change the configuration for your use case.
#
# Refer to https://docs.aerospike.com/docs/connect/streaming-from-asdb/configuring/from-asdb-to-esp-configuring.html
# for details.
# The connector's listening ports, TLS and network interface.
service:
ports:
- 8080
manage:
ports: 8081
# The logging properties.
logging:
file: /var/log/aerospike-esp-outbound/aerospike-esp-outbound.log# ESP HTTP destinations.
destinations:
aws-lambda:
urls:
- https://myapp.execute-api.ap-south-1.amazonaws.com
max-connections-per-endpoint: 100
call-timeout: 10000
connect-timeout: 2000
health-check:
call-timeout: 3000
interval-seconds: 5000# Aerospike record routing to destination(s).
routing:
mode: static-multi-destination
destinations:
- aws-lambdaformat: jsonNotice that a destination called “aws-lambda” was defined under the destinations section and the URL of the AWS API Gateway was specified under urls. This destination is subsequently added to the routing section. You also have the option to specify multiple destinations. See here for more information on the above configuration.
Step 2: Configure a Lambda Invocation
Follow the instructions detailed here to configure the API Gateway for triggering the Lambda Function. Alternatively, you could also configure an application load balancer to trigger Lambda Function as detailed in this blog.
AWS REST API Gateway doesn’t convert binary format to base64 by default. Follow this blog to set it up. In our example code below, we are mapping the payload to the “body” param. AWS HTTP API Gateway converts binary format to base64 by default so no action is required there. Both REST and HTTP API have different payload formats. I have followed the HTTP API format in the code below so we need to map the incoming record’s payload to our desired format based on the “Content-Type” if we choose to use the REST API as shown in figure 2 below. The left side shows an example of binary data type mapping and the right side shows the mapping of textual format like JSON. If you choose the HTTP API, set the “Payload format version” to “1.0” to follow this example.
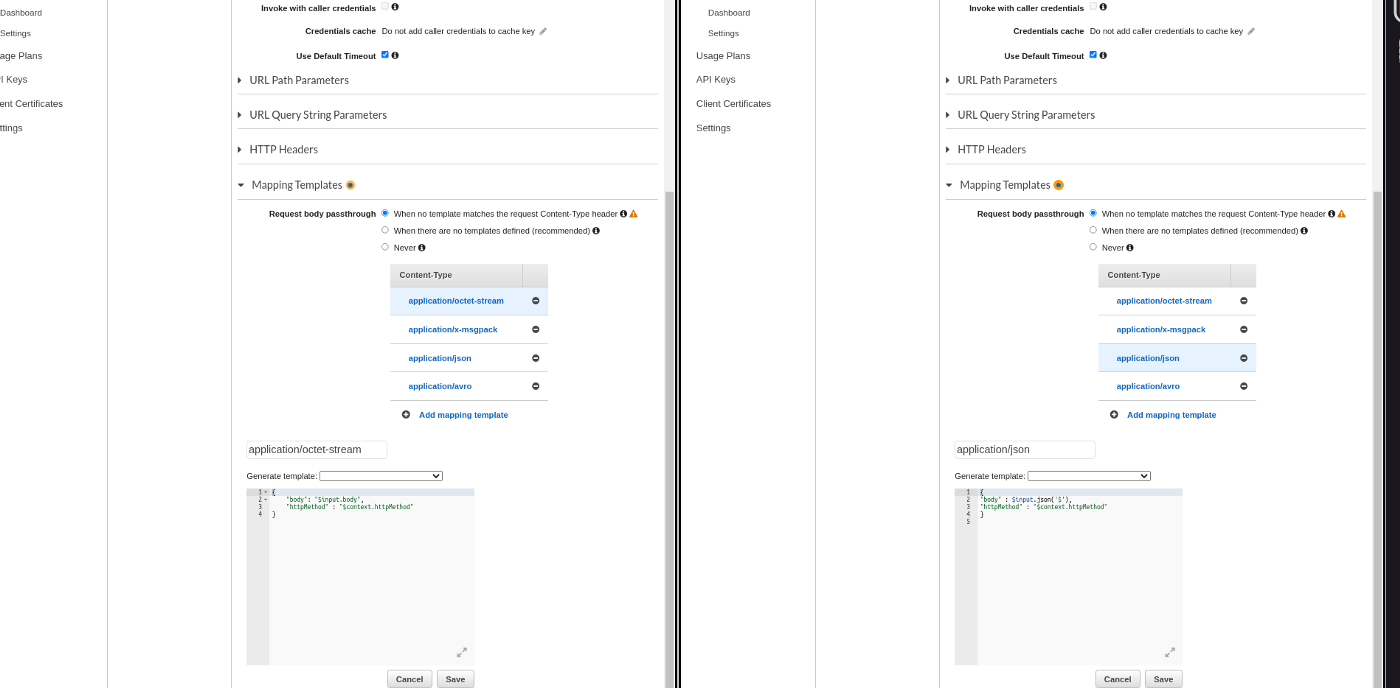
Figure 2 - REST API data type mapping for Lambda Function
Step 3: Trigger a Lambda Function
The simple Java code below will forward incoming ESP records to SQS. You would have to include SQS and Lambda dependencies in your project. Note that I haven’t specified the AWS credentials explicitly in this example. However, I’d encourage you to follow this documentation to learn how to secure your implementation.
package com.aerospike.connect.esp;import com.amazonaws.regions.Regions;
import com.amazonaws.services.lambda.runtime.Context;
import com.amazonaws.services.lambda.runtime.RequestHandler;
import com.amazonaws.services.sqs.AmazonSQS;
import com.amazonaws.services.sqs.AmazonSQSClientBuilder;
import com.amazonaws.services.sqs.model.SendMessageRequest;
import com.fasterxml.jackson.core.JsonProcessingException;
import com.fasterxml.jackson.databind.ObjectMapper;import java.util.HashMap;
import java.util.Map;import static java.util.Collections.emptyMap;public class LambdaHandlerJava implements
RequestHandler<Map<String, Object>, Map<String, Object>> { private static final ObjectMapper objectMapper = new ObjectMapper();
private static final String AWS_SQS_NAME = "esp.fifo"; @Override
public Map<String, Object> handleRequest(Map<String, Object> input,
Context context) {
Object rawInput = input.get("body");
String inputBody = rawInput != null ? rawInput.toString() : ""; // We need to check for the POST request as ESP connector will perform
// health-check at the configured interval, and we don't need to push
// that to SQS.
if (!input.get("httpMethod").toString().trim().equals("POST")) {
return getResponse(inputBody);
}
pushToSQS(rawInput);
return getResponse(inputBody);
} private void pushToSQS(Object rawInput) {
AmazonSQS sqs =
AmazonSQSClientBuilder.standard().withRegion(Regions.AP_SOUTH_1)
.build();
String queueUrl = sqs.getQueueUrl(AWS_SQS_NAME).getQueueUrl();
SendMessageRequest sendMsgRequest;
try {
sendMsgRequest = new SendMessageRequest()
.withQueueUrl(queueUrl)
.withMessageGroupId(LambdaHandlerJava.AWS_SQS_NAME)
.withMessageBody(getMessageBody(rawInput));
} catch (JsonProcessingException e) {
throw new RuntimeException(e);
}
sqs.sendMessage(sendMsgRequest);
} private String getMessageBody(Object rawInput)
throws JsonProcessingException {
// REST API sends the data in object format whereas, an HTTP API
// sends the String.
return rawInput instanceof String ? (String) rawInput :
objectMapper.writeValueAsString(rawInput);
} private Map<String, Object> getResponse(String inputBody) {
Map<String, Object> response = new HashMap<>();
response.put("statusCode", 200);
response.put("body", inputBody);
response.put("isBase64Encoded", false);
response.put("headers", emptyMap());
return response;
}
}Once your code is ready, create an Uber jar of your project so that it bundles all the dependencies, and proceed to the AWS console for the remaining setup:
On the Lambda homepage, follow the below steps:
Hit the Create function button
Select Author from scratch option
In the Basic information section
Enter the function name of your choice
In the Runtime dropdown, select the Java 11 or whichever latest version of Java it offers
Leave the other opinion to their default and hit the Create Function button
The previous step will redirect you to your newly created function page. In the Code tab:
In the Code Source section. Hit the Upload from dropdown and select the
.zip or .jar file option and upload your Uber jar.
In the Runtime settings section, click on Edit, and enter the Fully qualified Java class name followed by ‘::handleRequest’ in the Handler input box. It should be com.aerospike.connect.esp.LambdaHandlerJava::handleRequest as per the above example code. Leave the other fields as is and save your changes.
Once saved, your Lambda function’s homepage should look like Figure 3. Note that “esp-outbound” is the name of the Lambda function that I have used.
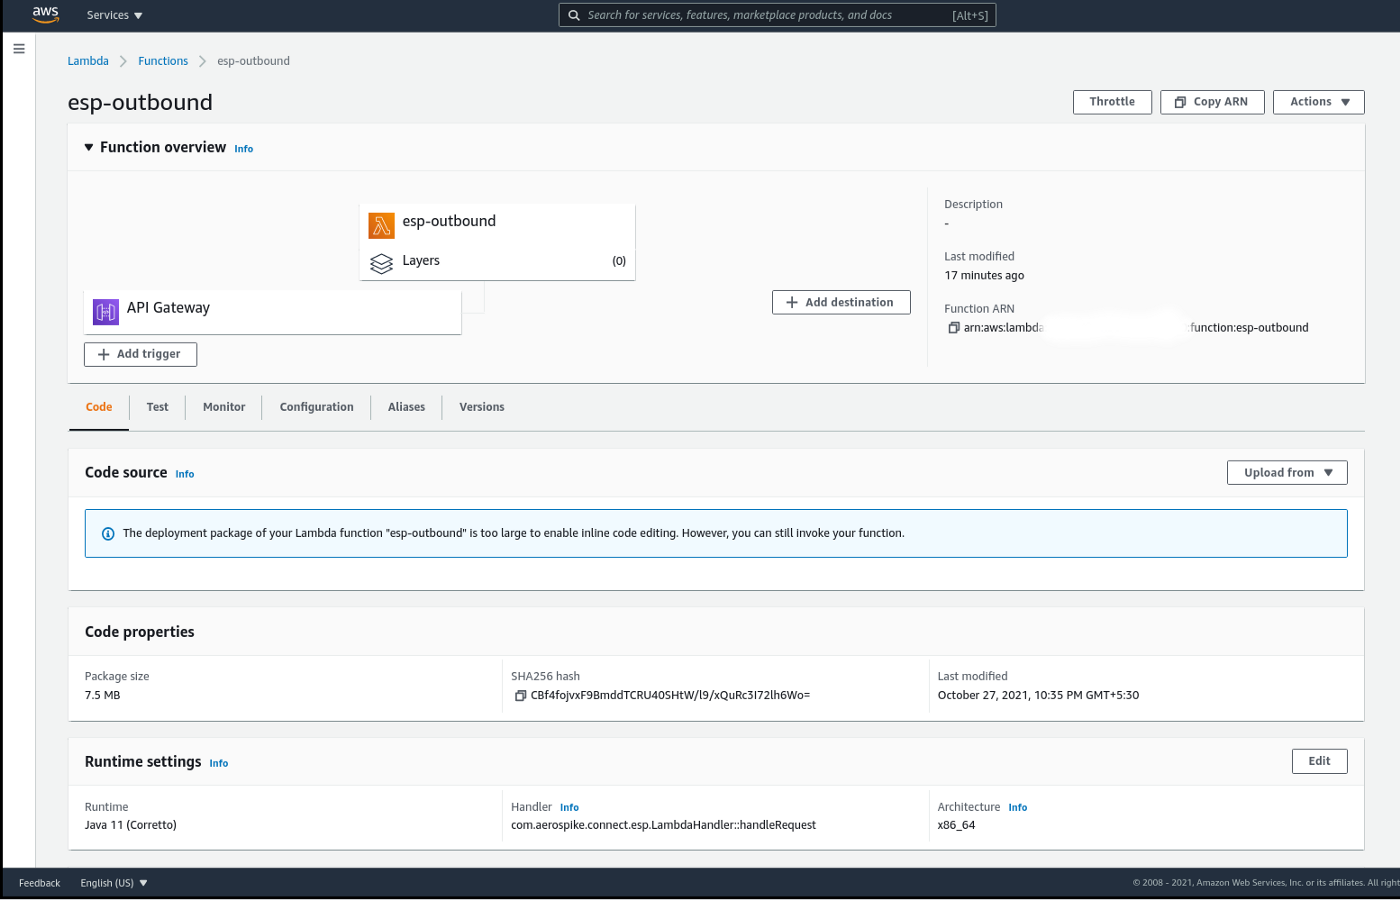
Figure 3 - AWS Lambda console
I’d encourage you to refer to this blog to understand the performance limitations of Lambda vis-a-vis concurrency limits, start time, and the tricks to write performant functions.
Step 4: Set up SQS
I have used the FIFO queue in SQS. Although there are several minute configuration options available for SQS, none are required for this example. You can choose to follow the basic steps to set up your queue from the AWS console. Once done, the homepage of your FIFO queue should look like figure 4.
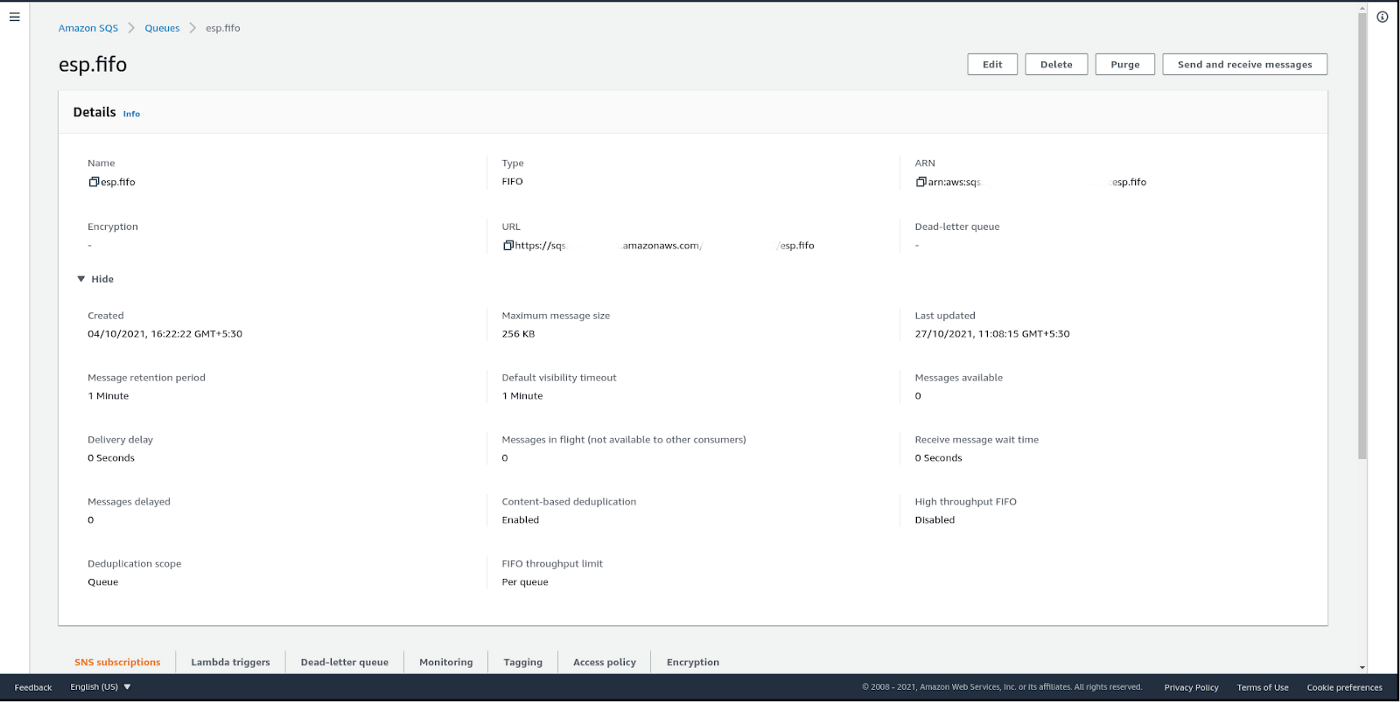
Figure 4 - AWS SQS console
Step 5: Test the pipeline
Now, this is where the rubber meets the road. In the Aerospike AQL window, type the following commands to trigger an INSERT change notification message as shown in figure 5.
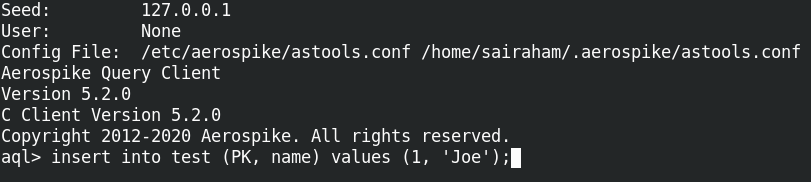
Figure 5 - Inserting data into Aerospike to trigger an INSERT change notification
Viola! The message shows up in the SQS console. Look at Messages available under Receive messages in figure 6.
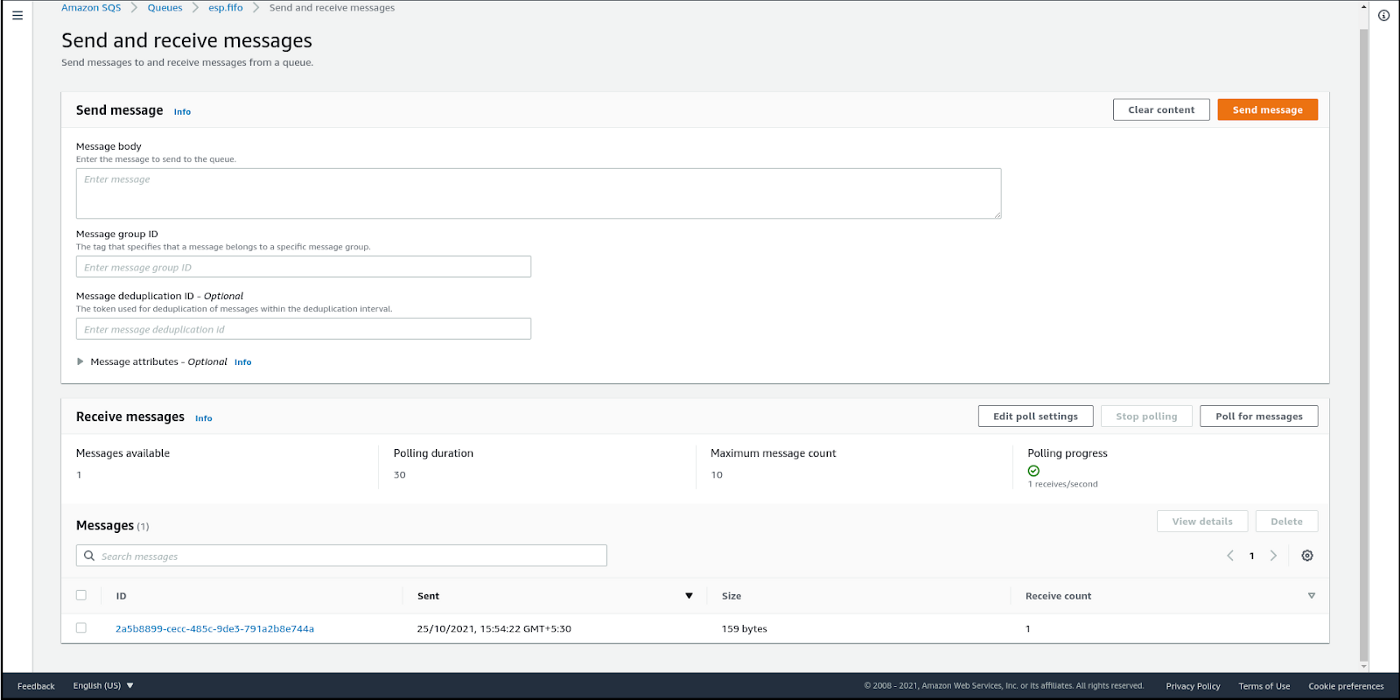
Figure 6 - Change Notification message is received
Seeing is believing! As seen in figure 7, you can verify that the message type is “write” and the “name” bin contains the value “Joe” that you had inserted earlier via the AQL session.
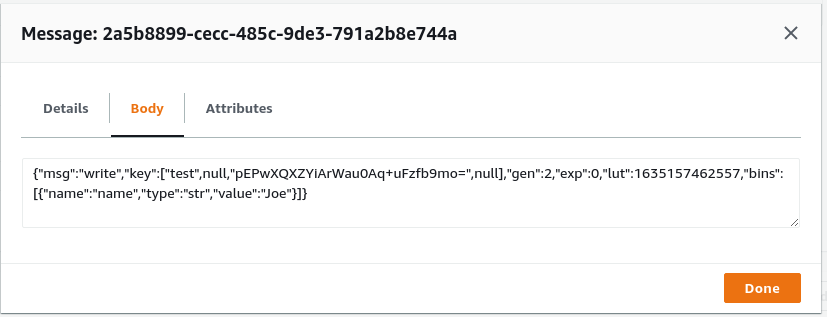
Figure 7 - Received message validation
Wear your Operations hat and monitor the CloudWatch metrics for AWS Lambda to observe the throughput of Lambda function invocation as shown in figure 8.
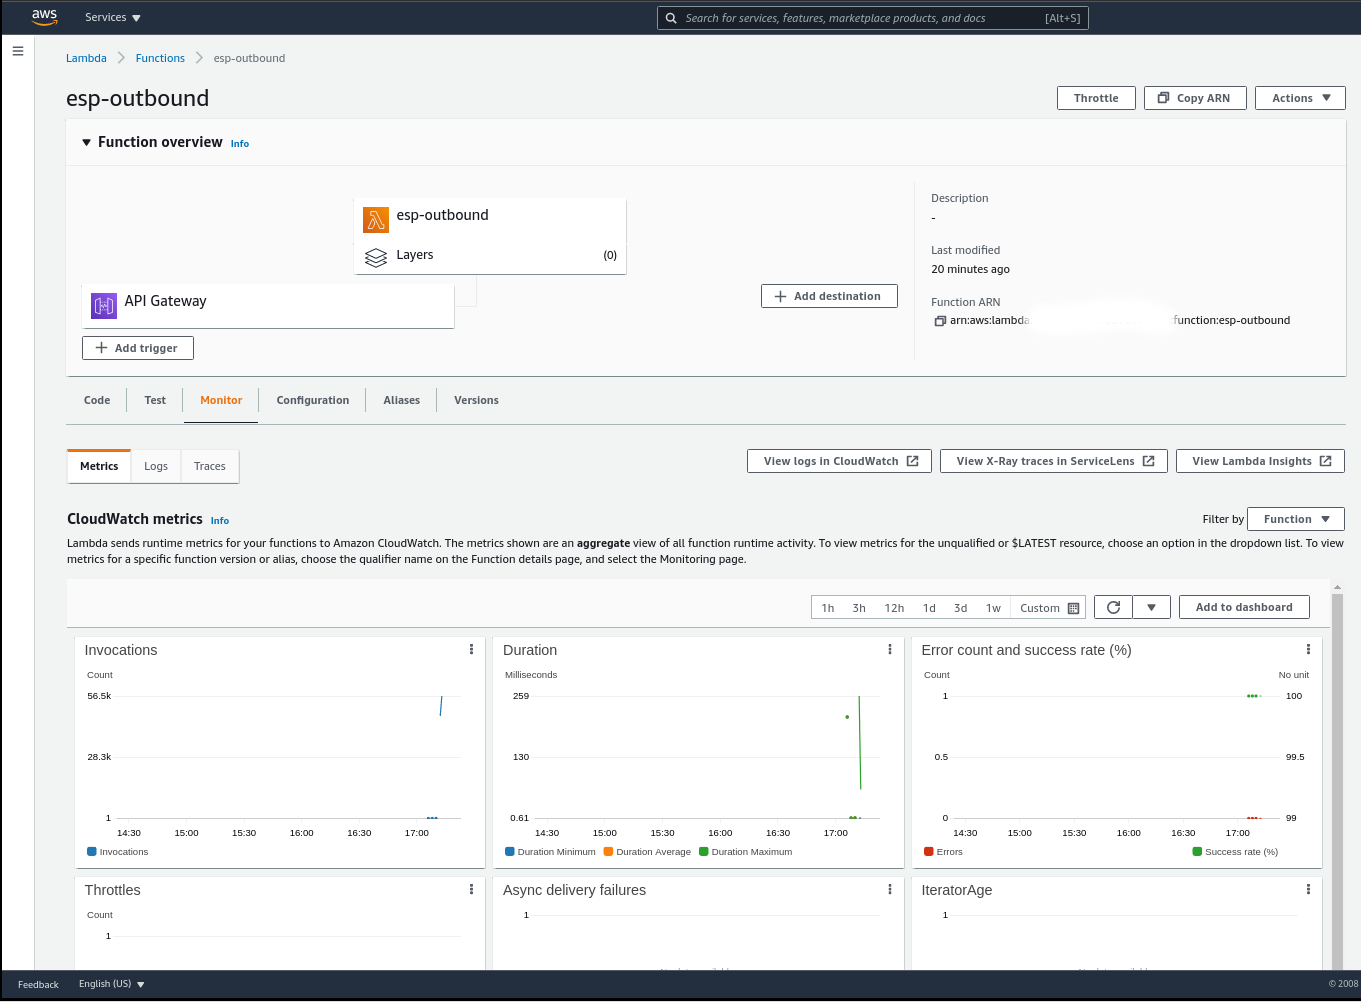
Figure 8 - Monitoring in action for AWS Lambda
Additional Capabilities
A few additional capabilities that you can leverage to make your streaming pipeline robust:
LUT (last-update-time) of the records are shipped as metadata along with the message, so consider using it for ordering messages in your downstream application.
XDR’s at-least-once delivery guarantee is extended by the ESP connector to limit message loss. So even if the connector instance goes down or the link between the connector and XDR is down, your pipeline will still be able to recover.
ESP Connector can be used in conjunction with XDR filter expressions in the server to filter out records before transmission. For example, you could filter out sensitive records before streaming them downstream.
HTTPS is supported, hence you can choose to secure the ingress and egress traffic from the connector.
Multiple destinations can be configured so that you can simultaneously stream to multiple destinations using the same ESP cluster.
Text serialization format, such as JSON or FlatJSON, or a binary format, such as Avro or MessagePack, are available for efficient data exchange.
The option to add custom headers to each HTTP request is also available.
Monitoring the health of the ESP connector via Prometheus/Grafana as depicted in figure 9 is supported. See Prometheus integration for more details.
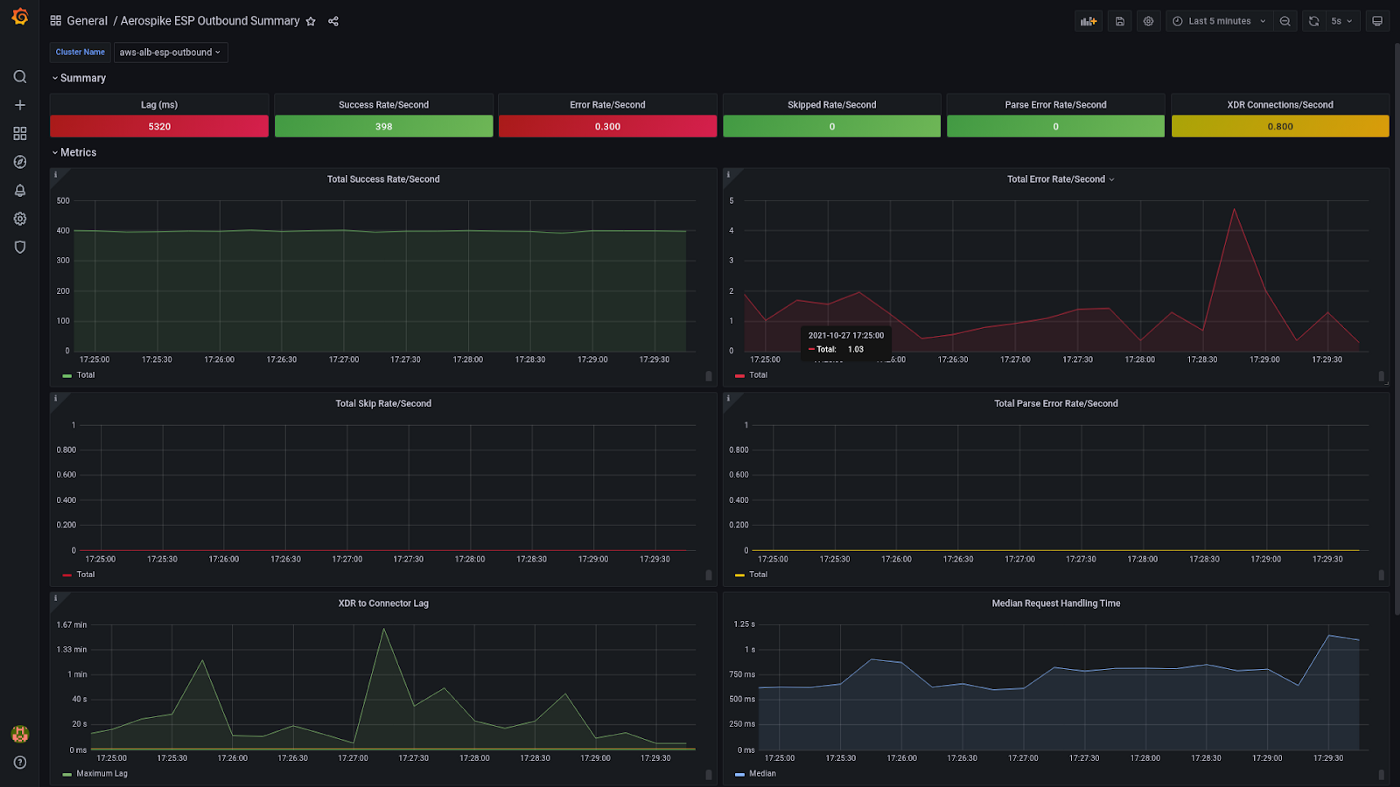
Figure 9 - Monitoring in action for the ESP Connector
Potential Use Cases
Here are a few potential use cases that can help spark your imagination:
Back up Aerospike data to S3 or Google Cloud Storage for archival purposes.
Stream Aerospike data to AWS SageMaker or Google AI to help you build cloud-native AI/ML pipelines with the best of breed AI/ML services.
Encrypt Aerospike data for compliance using AWS KMS, before ingesting it into your data lake.
Write Aersopike data to Kinesis Data Streams for real-time analytics use cases such as real-time dashboards, anomaly detection, dynamic pricing, and many more.
The Aerospike database will help you realize the above streaming pipelines with low latency and high throughput. If you have any other interesting use case in mind that Aerospike and serverless functions can bring to life in AWS or GCP, then wait no more. Please download Connect for ESP, full-featured single-node Aerospike Database Enterprise Edition, and refer to our documentation for a seamless trial experience.
Happy streaming, Serverless style!
I would like to thank Kiran Matty for co-authoring the blog, Joe Martin, and Ashish Shinde for reviewing it.